TP-Link - Tapo - How to view Tapo camera on PC through RTSP stream?
The Tapo camera supports the RTSP protocol, so it can work with third-party NVR or NAS devices that also support the RTSP protocol
If a user wants to view the live stream of the camera with a third-party app like VLC Player, he will just need to input the URL of the RTSP stream on the VLC Player app.
The URL of the RTSP live stream for the Tapo cameras will be:
For high quality stream1: rtsp://IP Address/stream1
For low quality stream2: rtsp:// IP Address/stream2
Notes:
1. The username/password is the camera account that you created via the Tapo app.
2. The IP address is the camera’s IP address assigned by your host router. You can find it on your host router’s DHCP list or in the Tapo app (Go to Camera Settings and navigate to the camera details page).
3. If you want to view the live stream of the Tapo camera with a third-party app remotely, you will need to open port 554 for the camera on your host router first.
4. You could also use ONVIF standards to add the Tapo camera with its username/password and IP address.
5. For Tapo C310, the resolution of the tream1 is determined by the video quality set on the Tapo APP.
If you need to watch the 3MP HD Video via RTSP, please change the video quality to Best Quality on the Tapo APP and use: rtsp://IP Address/stream1
Apart from the Tapo app, Tapo cameras can work with other third-party software to use and manage your Tapo camera.
Note: Before you start, make sure the computer and your camera are connecting to the same network.
Step 1: Create a camera account in the Tapo app
1. On the home page, tap on your camera model card or tap Camera Preview > Manage to go to the Live View page.

2. On the Live View page, tap the gear icon to enter the Camera Settings page.

3. Tap Advanced Settings, then select Camera Account to create an account (username and password) for camera login on other portals.

Step 2: Add your Tapo camera on iSpy
1. Run the iSpy software on your computer.
2. Click Add on the top left menu and select ONVIF Camera.

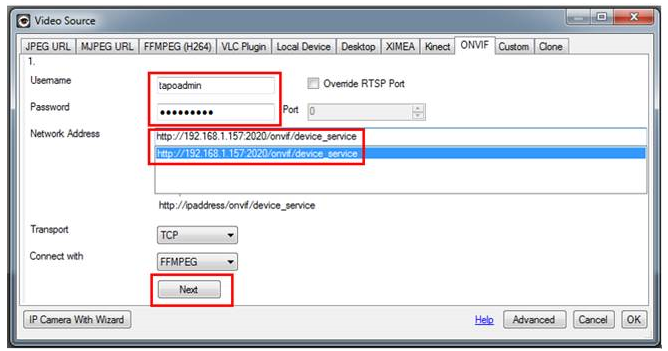
3. Enter the Username and Password that you set for your camera on the pop-up window, select Network Address, and click Next. You can customize other parameters if needed.

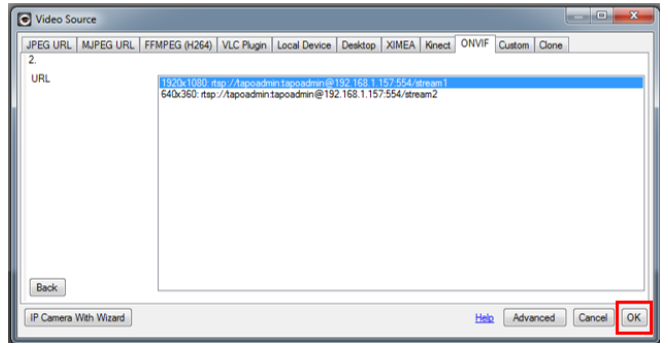
4. Choose the video resolution and click OK.

5. Customize the camera settings as needed, including Microphone, Talk, Motion Detection, Alerts, Recording, Images, Scheduling, and Storage. You can also change all the settings later. Click Finish to complete adding your camera to iSpy.

6. After adding your Tapo camera to iSpy, you can monitor and manage it using the app. View the live, customize motion detection, check the recordings when motion detected, set recording schedules, record videos and more.

To get to know more details of each function and configuration please go to Download Center to download the manual of your product.