FTP, which stands for File Transfer Protocol, is a network protocol designed for transmitting files between computers over local networks or the internet. It is commonly used when you want to store images or videos captured by a camera or recorder onto an FTP server.
In the context of closed-circuit television (CCTV) setups, FTP is often employed to directly save snapshots taken by a camera.
In the following steps, we will guide you through the process of configuring a standalone camera to send periodic snapshots to a remotely hosted FTP server. These snapshots will be captured every 10 minutes, specifically between 6am and 5pm from Monday to Friday. This configuration is typically used to create a time-lapse video, documenting the progress of a construction project, for example.
STEP 1
To set up an FTP server, you have the option of hosting it locally on your network or using a remote hosting service. Setting up your own server requires knowledge of computer networks. However, if you prefer a simpler approach, you can opt for services like http://couchdrop.io, which provide FTP server hosting.
When selecting an FTP service, it is advisable to choose SFTP (Secure File Transfer Protocol) for enhanced security.
Once you have set up an FTP server, it is recommended to test its functionality by connecting to it using an FTP client. FileZilla (https://filezilla-project.org/download.php) is a user-friendly client that you can use for this purpose.
STEP 2
To configure the camera for FTP snapshot storage, follow these steps:
-
Ensure the camera is connected directly to the internet, not through an NVR's PoE port. You will need a computer to log into the camera's web interface.
-
Log in to the camera's web interface.

-
Navigate to the "Video" section and locate the "Snapshot" settings. Set the interval to 600 seconds (10 minutes), and then save the changes.

-
Go to the "Storage" section and access the "Schedule" settings under "Snapshot". Customize the schedule according to your requirements. In this example, the schedule is set from 6am to 5pm, Monday to Friday. Save the changes.
-
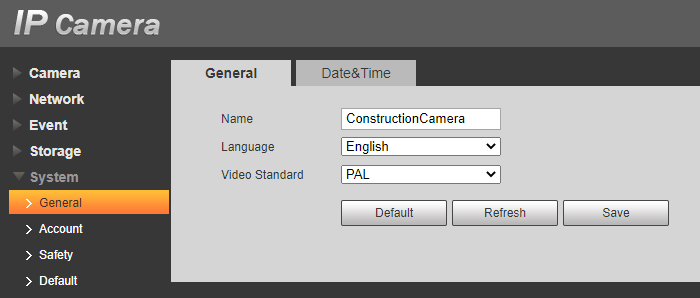
Before setting up FTP, ensure you have assigned a name to the camera. This ensures proper organization of the files stored on the FTP server. You can find the camera name setting under the "System" section, specifically "General"
-
Under the "Storage" section, go to "Destination" and select the FTP option for the snapshot location. Save the changes.

-
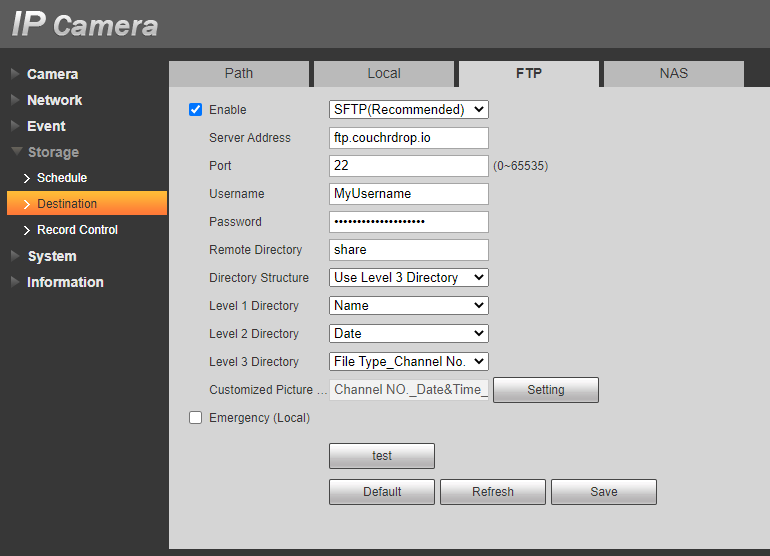
Still in the "Destination" settings, locate the "FTP" option. Enable SFTP and enter the Server Address, Port, Username, Password, and Remote Directory for the FTP server. Save the changes. Use the "Test" button to verify the server connection. Note that not every camera model may have "Directory Structure" or "Customized Picture" settings.
By following these steps, you should be able to configure the camera to send snapshots to an FTP server based on your desired schedule.