PLAYBACK
To access footage playback, select the Search button from the Main Menu.
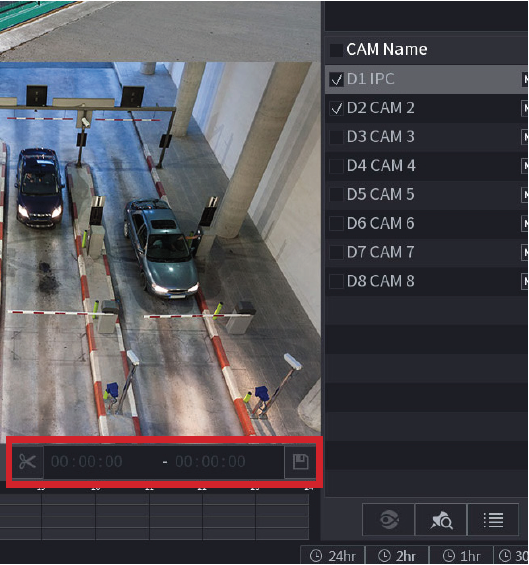
Stored footage can be accessed by searching by date and refined by footage type (Regular, Motion Detection, Alarm, etc). The below image details the playback interface with footage selected.
The calendar days that have footage available for playback will be indicated by a dot.

- Make sure to select the correct HDD (hard disk drive) and choose REC in the Source Select option.
- Utilize the Date Select calendar to pick the desired date for footage playback. A colored date icon indicates that stored footage is available for that particular day.
- In the View Select section, tick the boxes next to the cameras you want to view.
- The Footage Timeline will populate with stored footage, represented by colored bars on the timeline. Click anywhere on the timeline to start playback of the footage. The playback of other cameras will automatically synchronize with the selected camera.
- For more precise control over playback, you can zoom in on specific areas using the Timeline Zoom feature, allowing you to focus on a specific time range of up to 30 minutes.
- Using the Playback Controls, you can adjust the playback speed to speed up or slow down the footage, place marks on important moments in the footage, and capture snapshots as needed.
BACKUP
To determine the start and end points of backup footage using the Search Menu and referencing playback videos, follow these steps:
- As explained in the previous section about playback, locate the specific footage you want to back up. Tick the checkbox next to the desired camera to select it.
- Utilize the Footage Timeline to navigate to the approximate starting time for your backup video. Click the
 Clip Button on the Backup Controls to set the start point.
 - Once again, using the Footage Timeline, click on the approximate desired time for your backup video's end point. Select the
 Clip Button again to set the end point.
 - Click the
 Save Button to open the Backup menu.
 - If you want to add more clips from different channels, you can repeat the process.
- Connect your USB device, and disregard any automated prompts. Then, select the Backup option to initiate the backup process.