If Your Screen Is in Platform Mode
If your display is currently running in Platform mode, it is expecting media to be delivered over the network and will not respond to a connected HDMI source until you exit this mode. You will need to navigate out of Platform mode manually before changing the input source.
Required — Exit Platform Mode First
Do not attempt to change the input source while the display is in Platform mode. Follow the steps below before proceeding with the HDMI configuration.
-
1
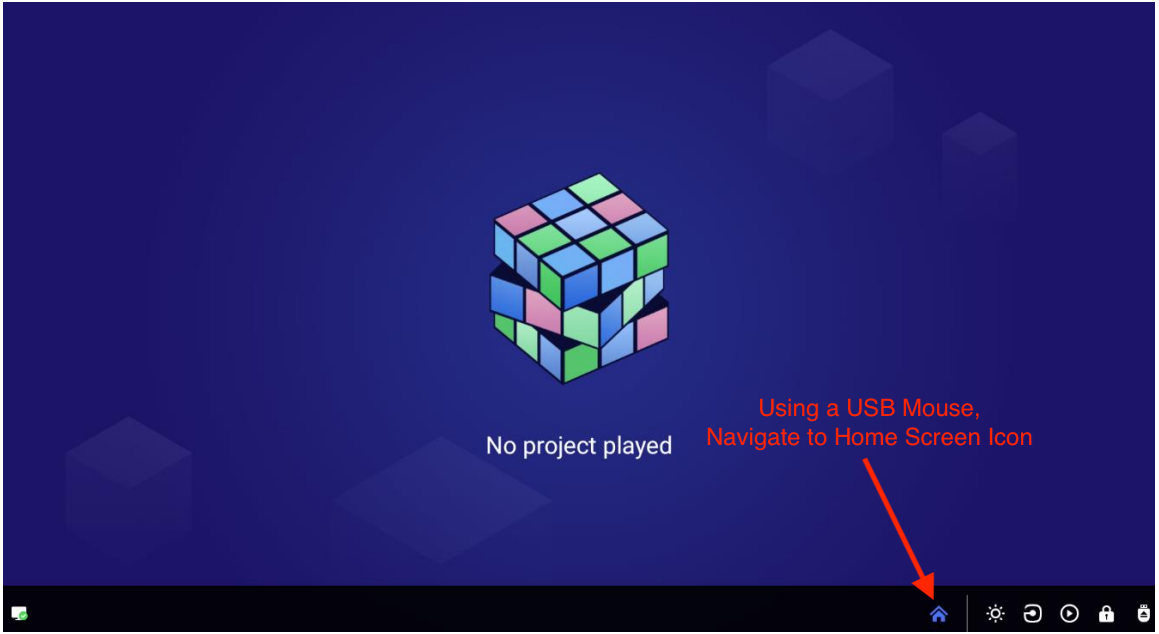
Connect a mouse to the display
Plug a USB mouse directly into the digital signage screen itself — not into a connected PC or source device. -
2
Navigate to the Home button
Using the mouse, locate and click the Home button at the bottom of the screen. This will exit Platform mode and return you to the device's main interface.
-
3
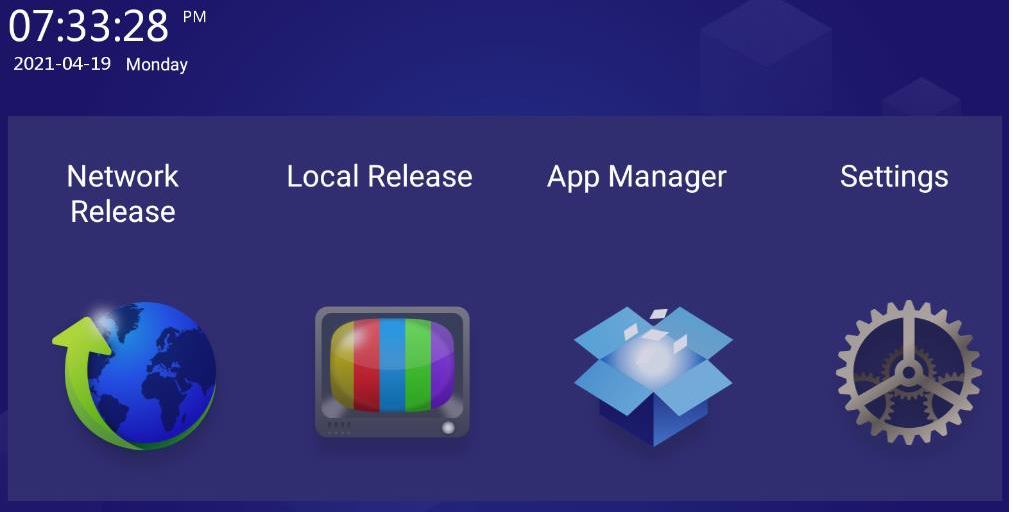
Open the main menu
From the home screen, navigate toMain Menu → Settings. You can now proceed with the HDMI input source configuration below.
What You Need
- Source device A PC, laptop, media player, or any device with an HDMI output.
- HDMI cable A working HDMI cable connected at both ends — to the source device and to the display.
- Signage display Your display must be powered on before changing the input source.
Compatibility Note
Not all device models support HDMI input. If the HDMI option does not appear in your Input Source Settings, check your device specifications to confirm whether HDMI is supported.
Configuring HDMI Input
-
1
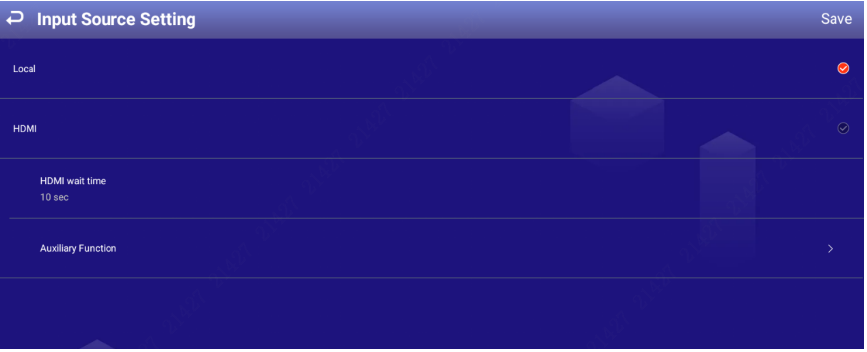
Open Input Source Settings
From the main screen, navigate toSettings → Input Source Setting. -
2
Select HDMI
Choose HDMI as your input source. The display will immediately begin showing the output from your connected device.
-
3
Set the HDMI Waiting Time
Configure how long the display waits for a valid HDMI signal before taking action. This determines how quickly the display falls back to local content if the signal is lost or interrupted.
What Happens When There Is No HDMI Signal
If the display cannot detect an HDMI signal, it follows a fixed sequence before switching away from the HDMI source.
- No signal detected The screen displays a NO SIGNAL message.
- Waiting period The display holds on the HDMI source for the duration of your configured waiting time.
- Countdown A 10-second countdown begins once the waiting time has elapsed.
- Automatic fallback The display switches to Local content — videos or images stored locally on the device or via the platform.
Important
Once the display has switched to local content, simply replugging the HDMI cable is not enough. You must return to
Settings → Input Source Setting and re-select HDMI to restore the source.
Troubleshooting
| Symptom | Likely Cause | Fix |
|---|---|---|
| Screen shows NO SIGNAL | HDMI cable not fully connected | Check both ends of the HDMI cable are firmly seated. |
| Wrong source showing | Input source not set to HDMI | Go to Settings → Input Source Setting and re-select HDMI. |
| Screen switched to local content | HDMI waiting time expired | Replug the HDMI cable, then re-select HDMI from Input Source Setting. |
| No image from PC | PC in sleep mode or wrong display output | Wake the PC and ensure it is set to output to the correct display. |